How To Add Cobwebs in Photoshop in 4 Simple Steps:
Step 1: Download the Cobweb Brushes.
Step 2: Install the Cobweb Brushes into Photoshop. Follow the Loading Brush Guide if needed.
Step 3: Create a new layer in your Photoshop layers panel.
Step 4: Grab a soft white brush at 100% opacity and select desired Cobweb brush.
Step 5: With the new layer highlighted, use the brush by taping down on your image.
*If you want to resize the cobweb or relocate it to a different area of the image, use the Free Transform tool. Edit—–> Free Transform, or short cut Command T.
Above is a complete tutorial from start to finish of a fun Halloween edit I did of my son. However, if you want to just quickly see how I added the cobwebs to the image, jump ahead to the 11:25 mark and enjoy!
Friends: For those of you who prefer reading over watching a video, I transcribed this tutorial just for you!
Hi everyone. This is Heather Smith with Storyville photography. And today I’m gonna show you how to achieve this Halloween-inspired edit of my son. This is the before and after!
 BEFORE
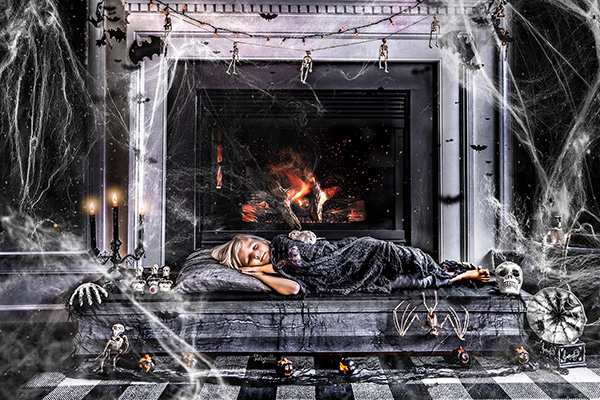 AFTER
AFTER
The first thing you’re gonna wanna do is have your image open into Lightroom and then select the Simplicity 1 preset. Next, pull the shadows up, push your temp slider to the right, and warm it up to where your eye likes it. Then open your image in Photoshop.
Once in Photoshop, to crop your image in a little, hit command a to select it, and then go up to selection, transform selection, and to the desired crop. Next hit the check mark and go to image crop. You want to get rid of all the extra space around the edges and focus on your subject. The next thing you wanna do is make a copy of the background layer. Select the background layer, hit command J, and then go up to filter Camera Raw Filter. From there, go to the preset icon and select the Black Velvet 1 preset. I love to stack presets guys, as you can see! In Lightroom, I did the Simplicity and then I went ahead and stacked the Black Velvet right on top here in Photoshop. It gives it this magical, cartoon feel. I just love it. If your image takes on a slight blue tint, go into your adjustments and select hue and saturation. Go into your blue hue and desaturate that completely.
The next step is to go to your actions panel and select the Ultimate Dodge and Burn action and hit play. Starting with the environment, select the Dodge and Burn Combo. Make sure you have a soft white brush, at a hundred percent opacity, and start dabbing it where you would like. I love this combination so much it Dodges and Burns at the same time and it just makes life easy. I just love Halloween guys. I don’t know about you, but I love letting your imagination can just go crazy, it’s the best. Next, it is time to do some burning. If you want to do a few layers of burning, just hit command j a couple of times to duplicate the burn layer. In this tutorial, I burned the fireplace and the logs and under, the floor, and the windows.
Next, you are going to Dodge highlighted areas that you want to pop! Make sure to zoom in to avoid halos and take your time! Make copy of the dodge layers if you need to, just like the burn layers.
Now, grab your Scattered Bat brushes. You can resize these with your bracket keys. Go ahead and just plop them around where you would like. To add a little more depth of field, add a little gaussian blur to some. If you want to remove some of the bats, add a layer mask to your layer and use a soft black brush at 100% opacity to mask them off.
Moving on, the next thing you want to do is grab the Urban 9 Texture. Drag and drop it on top of your image and set the blending mode to soft light. Duplicate the texture by hitting command J and then group them by holding the shift down and selecting the group option. Add a layer mask and remove the texture from your subject using a soft black brush.
Now moving on to the Cobweb brushes. I love these brushes. They just add so much to the image. Add a new layer, make sure your brush is white, and grab the Cobweb 3 brush. Click it down command T to resize it. You can always hit command J to brighten them up. Each time you add a new cobweb, add a new layer. This way if you can move them around, adjust their size and opacity individually.
Next, add a black radial gradient. Make sure it’s on black and then I’m gonna choose the gradient radial and set blend mode to soft light. Take the opacity down to 0 and slowly increase it to where your eye likes it. I set mine at 76% opacity in this tutorial.
Now it is time to make the candles glow. To do this wanna open up the Ultimate Light Pack. Drag and drop sun number 2, shrink it down and set it to screen mode. Add gaussian blur at about 40% to easily remove the hard edges from the overlay. Then hit command T to move the overlay over the candle. Next hit command J twice to duplicate the candlelight and move a copy over to the other 2 candles.
The last thing you want to do is add dust particles floating around. To do this, add a new layer and I am going to select my floating particles. Brush on where desired.